
Resin flooring systems create a seamless, durable, and high-performance surface suitable for everything from industrial warehouses to residential garages and basements. These liquid-applied coatings bond directly with a substrate, typically concrete, to form a tough, protective layer that can be tailored for specific aesthetic and functional needs.
This comprehensive guide covers everything you need to know about resin flooring in 2025. We will explore the different types, break down costs, walk through installation and preparation, and help you decide whether to DIY or hire a professional.
What is Resin Flooring?
Resin flooring is a hard-wearing plastic surface created by mixing two or more chemical components—a base resin and a hardener—to trigger a chemical reaction. When this mixture is poured or rolled onto a surface, it cures into a solid, seamless, and durable floor. The most common substrate for resin flooring is concrete, as the resin bonds tenaciously to the porous surface, enhancing its strength and protecting it from wear, chemicals, and moisture.
The primary appeal of these systems lies in their versatility. They can be formulated to be extremely hard, flexible, chemical-resistant, anti-slip, or purely decorative. This adaptability makes them ideal for a wide range of applications, from heavy-duty industrial environments to pristine commercial showrooms and modern residential interiors.
Resin vs. Epoxy: Clarifying the Terms
People often use the terms “resin flooring” and “epoxy flooring” interchangeably, but this can be misleading. Resin is the broad category of material, while epoxy is a specific type of resin. Think of it like this: all epoxy floors are resin floors, but not all resin floors are epoxy.
Here’s a quick breakdown:
Feature | Resin Flooring (General Term) | Epoxy Flooring (Specific Type) |
|---|---|---|
Definition | A broad category of floor systems using synthetic resins like epoxy, polyurethane, or polyaspartic. | A specific system using epoxide resin and a polyamine hardener. |
Primary Trait | Versatile; can be formulated for different properties (flexibility, UV resistance, etc.). | Known for its exceptional hardness, impact resistance, and chemical durability. |
Common Use | Can be used anywhere, with the specific resin type chosen for the application. | Best for indoor applications requiring high mechanical strength, like garages and warehouses. |
Understanding this distinction is key to selecting the right system for your project’s specific demands.
Types of Resin Flooring
Choosing the right type of resin is critical for ensuring your floor performs as expected. Each system has unique properties, cure times, and ideal use cases.
Epoxy (Epoxide Resin)
Epoxy is the most well-known and widely used resin flooring system. It creates an incredibly hard, durable, and compression-resistant surface, making it the go-to choice for areas subject to heavy loads and impacts. Epoxy bonds extremely well to properly prepared concrete and offers excellent resistance to a wide range of chemicals, including oil, gasoline, and cleaning agents. Its primary limitation is its poor UV stability, which causes it to yellow or “amber” over time when exposed to direct sunlight.
- Best For: Garages, basements, warehouses, manufacturing facilities, and commercial kitchens.
Polyurethane (PU)
Polyurethane flooring is more flexible and elastic than epoxy. This elasticity gives it superior resistance to abrasion, scratches, and impacts from sharp objects, as the surface can absorb the force without chipping or cracking. PU systems are also typically UV-stable, meaning they will not yellow when exposed to sunlight, making them suitable for areas with windows or even some outdoor applications. They handle extreme temperature fluctuations better than epoxy, which can become brittle in the cold.
- Best For: Multi-story car parks, food processing plants (where thermal shock is common), heavy-traffic commercial spaces, and areas requiring more scratch resistance.
Polyaspartic & MMA (Methyl Methacrylate)
Polyaspartic and MMA resins are known for one primary feature: incredibly fast curing times. A floor can often be installed and returned to service in a single day, a massive advantage for businesses that cannot afford extended downtime. Polyaspartic coatings are a type of polyurea that is UV stable, highly durable, and can be applied in a wider range of temperatures. MMA offers similar rapid-cure benefits and is exceptionally durable, often used in the most demanding commercial environments. Both are premium products with a higher material cost.
- Best For: Commercial projects with tight deadlines, outdoor patios, pool decks, and facilities that operate 24/7 like hospitals and airports.
Decorative Systems
Any of the above resin types can be transformed into a decorative system. By introducing additives like metallic pigments, colored vinyl flakes, or quartz granules, installers can create floors that range from a simple, uniform color to a stunning, three-dimensional marble effect.
- Metallic Epoxy: Uses metallic pigments to create a shimmering, molten-lava look. Popular in high-end garages, retail stores, and showrooms.
- Flake Floors: Vinyl flakes are broadcast into the wet resin and sealed with a clear topcoat. This creates a textured, multi-hued look similar to terrazzo or granite and adds slip resistance.
- Quartz Floors: Similar to flake floors but uses colored quartz sand for extreme durability and a uniform, slip-resistant texture.
Resin Flooring Costs: Materials, Labor & DIY vs Pro
The cost of resin flooring can vary significantly based on the system type, surface condition, project size, and labor rates in your area. Below is a general breakdown of what you can expect to pay per square foot in the US.
Cost Component | DIY Price Range (per sq. ft.) | Professional Installation (per sq. ft.) | Notes |
|---|---|---|---|
Materials Only | $2.00 – $5.00 | $3.00 – $7.00 | Professional-grade materials are higher solids and more durable than most DIY kits. |
Surface Prep | Varies (tool rental) | Included in labor | May cost $1-$3/sq. ft. if priced separately. Includes grinding and repairs. |
Labor | $0 | $4.00 – $8.00+ | Varies by region and complexity (e.g., decorative systems are more). |
Total All-In Cost | $2.50 – $7.00 | $7.00 – $15.00+ | Decorative or high-performance systems can exceed $20/sq. ft. |
Example Cost Scenarios: 250 sq. ft. Garage
Let’s apply these numbers to a common residential project—a one-car, 250-square-foot garage.
- DIY Kit Scenario:
- Materials: A high-quality, 100% solids epoxy kit might cost around $500–$800.
- Tool Rental: Renting a concrete grinder could cost $150–$250 for a day.
- Total DIY Cost: Approximately $650–$1,050, or $2.60–$4.20 per square foot. This assumes you perform all labor yourself and the concrete needs minimal repairs.
- Professional Installation Scenario:
- Total Cost: Using a mid-range estimate of $9 per square foot, a professional installation would cost around $2,250.
- Total Pro Cost Range: Anywhere from $1,750 (at $7/sq. ft.) to $3,750 (at $15/sq. ft.) for a high-end decorative system. This price includes all surface preparation, materials, labor, and often a warranty.
While the DIY route offers significant savings, the professional price reflects expertise, specialized equipment for preparation, superior materials, and a guarantee against installation failure.
Surface Preparation: Step-by-Step
Over 80% of resin flooring failures are due to improper surface preparation. The resin needs a clean, porous, and profiled surface to achieve a permanent mechanical bond. Skipping these steps is a guarantee of future peeling and delamination.
Concrete Assessment & Repairs
First, inspect the concrete slab. It must be free of any sealers, oils, or curing agents that could block the resin’s penetration. A simple test is to pour a small amount of water on the surface; if it beads up instead of soaking in, a sealer is present and must be removed. Identify and repair all cracks, spalls, and pits. Use an epoxy-based crack filler or patching compound for a permanent fix, as standard concrete patch products may not be compatible. The concrete must also be fully cured (at least 28 days old) and have a moisture level below the resin manufacturer’s specified limit.
Grinding/Scarifying vs. Acid Etching
To create the ideal surface profile—known as a Concrete Surface Profile (CSP) of 2-3—the top layer of concrete must be mechanically abraded.
- Diamond Grinding: This is the professional standard. A walk-behind or handheld grinder with diamond-tooled discs scours the surface, removing contaminants and creating a perfect profile for bonding. It is the most effective and reliable method.
- Shot Blasting: Uses tiny steel beads to blast the surface. It is very effective but aggressive, often used for industrial applications requiring a thicker coating.
- Acid Etching: A common DIY method that uses a solution of muriatic or phosphoric acid to dissolve the top layer of cement paste. While cheaper, it is far less reliable than grinding. It can produce an uneven profile, is difficult to neutralize completely, and introduces water into the slab, which must fully dry before coating. Professionals almost never use acid etching due to its high risk of failure.
Printable Surface Prep Checklist
[ ] Clear the entire floor area.
[ ] Sweep and vacuum all loose dust and debris.
[ ] Degrease oil spots with a dedicated concrete degreaser.
[ ] Repair all cracks and spalls with an epoxy patching compound.
[ ] Mechanically grind the floor to a CSP 2–3 profile.
[ ] Vacuum the entire surface again to remove all grinding dust.
[ ] Wipe the floor with a solvent (like denatured alcohol) to pick up fine dust just before coating.
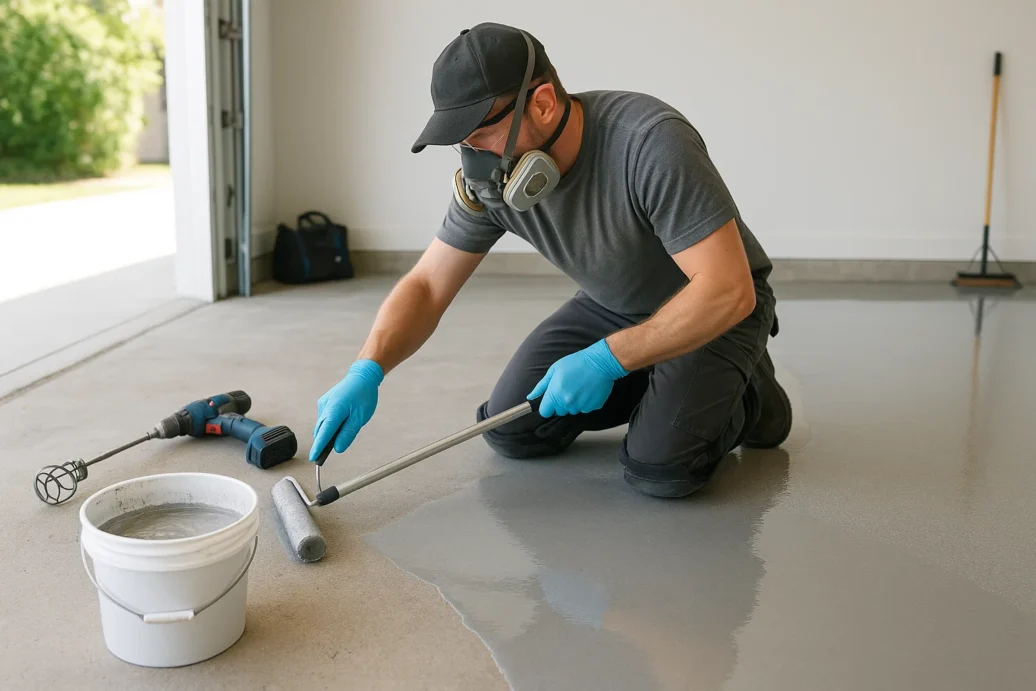
How to Apply Resin Flooring
Applying resin flooring is a time-sensitive process that requires careful planning and precision. Working conditions, mixing ratios, and application techniques must be followed exactly.
Tools & PPE Needed
- PPE: Nitrile gloves, safety glasses, spiked shoes (to walk on wet resin), and a respirator with organic vapor cartridges.
- Mixing: A low-speed drill (under 600 RPM) with a spiral mixing paddle, and several graduated mixing buckets.
- Application: High-quality 3/8” nap rollers, squeegees, and chip brushes for cutting in edges.
Mixing Ratios, Pot Life, and Working Temperatures
Resin systems are critically dependent on three factors:
- Mixing Ratio: The ratio of Part A (resin) to Part B (hardener) is precise. Never alter it. Use graduated buckets to measure exact volumes. Mix thoroughly for 2-3 minutes, scraping the sides and bottom of the bucket to ensure full integration.
- Pot Life: This is the time you have to work with the mixed product before it starts to cure in the bucket. It can be as short as 15-20 minutes. Only mix as much material as you can apply within that timeframe.
- Temperature: Ambient and slab temperatures affect curing. Most epoxies require temperatures between 60°F and 85°F. Colder temperatures slow curing, while hotter temperatures drastically shorten pot life.
Factor | Guideline |
|---|---|
Mixing Ratio | As specified by manufacturer (e.g., 2:1, 4:1) |
Typical Pot Life | 15–40 minutes |
Ideal Temperature | 60°F – 85°F (15°C – 30°C) |
Curing Times & Traffic Timelines
Curing happens in stages. Always follow the manufacturer’s technical data sheet, but here are some general timelines for a standard 100% solids epoxy system:
- Tack-Free Time: 8–12 hours. The floor can be walked on in spiked shoes for recoating.
- Light Foot Traffic: 24 hours. You can walk on the floor in socks.
- Heavy Traffic / Vehicle Use: 3–7 days. This allows the resin to reach its full chemical and mechanical hardness. Driving a car on it too early can cause permanent tire marks.
Design Options & Trends (2025)
Resin flooring is no longer just for industrial gray floors. Modern systems offer a stunning array of design possibilities that are becoming popular in both commercial and high-end residential spaces.
The leading trend continues to be metallic epoxy. These floors use pearlescent, nano-sized pigments that are agitated with a solvent or roller to create a three-dimensional, flowing look that mimics marble, brushed metal, or even lava flows. Each floor is a unique piece of art, making it a favorite for showrooms, retail boutiques, restaurants, and luxury home interiors like basements and living areas.
Vinyl flake systems remain a top choice for garages, locker rooms, and commercial spaces. By broadcasting colored flakes into the wet base coat, you can create a granite or terrazzo-like finish that is both decorative and practical. The texture of the flakes adds a degree of slip resistance, and the multi-hued pattern effectively hides dirt and minor imperfections. Color combinations are nearly limitless, allowing for custom branding or design matching.
Other trends include a shift toward more subtle finishes. Matte and satin topcoats are gaining popularity over the traditional high-gloss look, offering a more sophisticated and less clinical appearance. Solid colors are also being used more creatively, with designers incorporating logos, patterns, or directional markings directly into the floor using different colored resins.
Performance: Durability, Chemical Resistance & Lifespan
The performance of a resin floor is where it truly outshines other flooring options like VCT, tile, or polished concrete. Its seamless, non-porous nature makes it incredibly hygienic and easy to clean, while its chemical composition provides exceptional durability.
Expected Lifespan by System
A professionally installed resin floor is a long-term investment. Lifespan depends heavily on the system thickness, quality of installation, and level of traffic.
- Residential Garage (2-3 coat system): 10–20 years. A high-quality epoxy or polyaspartic system can last for decades with minimal maintenance.
- Commercial Space (light traffic): 8–15 years. Recoating the top layer every 5-7 years can extend this significantly.
- Industrial Facility (heavy traffic): 5–10 years. In extreme-duty areas, thicker urethane cement or trowel-down systems are used and may require more frequent refurbishment.
Scratch, Impact, and Chemical Resistance
This is where different resin types show their strengths.
- Impact Resistance: Epoxy is king. Its high compressive strength (often over 12,000 psi) allows it to withstand heavy, static loads and direct impacts without cracking or crushing.
- Scratch Resistance: Polyurethane and polyaspartic topcoats are superior here. Their flexibility makes them less prone to surface-level scratches from dragging equipment or furniture.
- Chemical Resistance: Most epoxies offer broad resistance to oil, gasoline, transmission fluid, and common salts. For environments with harsh acids or solvents (like laboratories or certain manufacturing plants), specialized novolac epoxy or urethane cement systems are required. Manufacturer technical data sheets provide specific resistance ratings for hundreds of chemicals.
Safety & Environmental Considerations
Safety during and after installation is a primary concern with resin flooring. The chemicals involved release Volatile Organic Compounds (VOCs) as they cure.
VOCs, Ventilation, and PPE
VOCs are solvents that evaporate into the air. High exposure can cause respiratory irritation and other health issues.
- Ventilation: Proper ventilation is non-negotiable during installation. Open all windows and doors and use fans to create cross-flow ventilation to exhaust fumes outside.
- PPE: A NIOSH-approved respirator with organic vapor cartridges is essential to protect your lungs from inhaling VOCs. Always wear gloves and safety glasses, as the resins can cause skin sensitization or chemical burns.
- Low-VOC Options: Many manufacturers now offer low-VOC or 100% solids resin systems. “100% solids” means the product contains no solvent or water carriers that evaporate, drastically reducing the amount of VOCs released. These are the preferred choice for indoor applications, especially in occupied spaces.
Disposal and Maintenance Safety
Uncured resin is considered a hazardous material and must not be disposed of in regular trash or poured down a drain. To dispose of leftover product, mix the resin and hardener together in the bucket and allow it to cure into a solid block of inert plastic, which can then be thrown away as normal solid waste.
For maintenance, use pH-neutral cleaners. Harsh, acidic, or high-alkaline cleaners can dull the finish or even chemically damage the topcoat over time.
DIY vs. Hiring a Pro — A Decision Checklist
The choice between a DIY installation and hiring a professional contractor comes down to a balance of cost, risk, and desired outcome. Use this checklist to decide which path is right for you.
When DIY is a Realistic Option:
- The Project is Small and Simple: A standard one or two-car garage is a manageable size for a motivated DIYer.
- The Concrete is in Good Condition: The slab is relatively new, unsealed, and has only minor cracks or stains.
- You Have a High Tolerance for Physical Labor: You are prepared to spend a full weekend on your hands and knees, operating heavy equipment like a concrete grinder.
- You Are Meticulous and Can Follow Instructions: You are comfortable with precise measurements and working against the clock (pot life).
- A Perfect, Flawless Finish is Not a Requirement: You can accept minor imperfections like roller marks, a trapped insect, or a bit of dust in the finish.
When to Hire a Contractor:
- You Need a Warranty: Professionals stand behind their work with a warranty against delamination, staining, or other failures due to improper installation.
- The Project is Large, Complex, or Commercial: Anything over 1,000 sq. ft. or requiring specific performance criteria (e.g., FDA-approved, extreme chemical resistance) needs a pro.
- The Concrete is in Poor Condition: An old, oily, sealed, or moisture-ridden slab requires professional remediation techniques and equipment.
- You Want a Decorative System: Achieving a professional-looking metallic or flake floor requires artistry and experience that is difficult to replicate on a first attempt.
- You Don’t Have the Time or Equipment: The cost of hiring a pro is justified when you factor in your own time and the cost of renting or buying specialized tools.
Maintenance & Repair: Keep Your Resin Floor Working for Years
One of the best features of resin flooring is its low maintenance. The seamless, non-porous surface prevents dirt, dust, and liquids from penetrating, making cleaning simple.
Cleaning Routines
- Daily/Weekly: Dust mop or sweep to remove abrasive grit. For a deeper clean, mop with a pH-neutral cleaner diluted in warm water. A double-bucket mopping system prevents spreading dirty water.
- Stain Removal: Most spills can be wiped up easily with a cloth. For tougher substances like dried paint or rubber tire marks, use a non-abrasive scrubbing pad and a solvent like denatured alcohol (test in an inconspicuous area first).
How to Fix Common Issues
- Chips and Gouges: If a heavy object creates a chip, you can repair it. Clean the area thoroughly with a solvent, sand the edges of the chip to create a profile, and then carefully fill it with a small amount of the same resin product used for the floor.
- Delamination (Peeling): This is typically a sign of a failed installation due to poor prep. The only real fix is to grind off the failed section, re-prepare the concrete below, and re-apply the coating.
- UV Yellowing: If an indoor epoxy floor has yellowed due to sunlight exposure, the process is irreversible. The only solution is to screen (lightly sand) the surface and apply a new, UV-stable topcoat like a polyurethane or polyaspartic.
Cost-Benefit & Use Cases
While the upfront cost of resin flooring can be higher than some alternatives, its long-term durability and low maintenance often make it a more economical choice over its lifespan.
Quick Comparison Table
Flooring Type | Avg. Cost/sq. ft. (Installed) | Lifespan | Key Benefit | Key Drawback |
|---|---|---|---|---|
Resin Flooring | $7 – $15 | 10–20+ years | Durability & Seamless | Prep is critical |
Polished Concrete | $4 – $9 | 20+ years | Low Maintenance | Porous, can stain |
Luxury Vinyl Tile (LVT) | $5 – $10 | 10–15 years | Aesthetic Variety | Seams can fail |
Porcelain Tile | $10 – $25 | 20+ years | Very Hard | Grout lines stain |
Best Use-Case by Space
- Healthcare & Labs: Seamless, anti-microbial, and chemical-resistant resin floors are the standard.
- Warehouses & Industrial: Heavy-duty epoxy or urethane cement systems withstand forklift traffic and abrasion.
- Retail & Showrooms: Decorative metallic epoxy or polished polyurethane offers a high-end, durable finish.
- Residential Garages: A DIY-friendly epoxy flake system provides a massive upgrade in both function and aesthetics over bare concrete.
Frequently Asked Questions
How long does resin flooring last?
A professionally installed resin floor in a residential garage can last 15-20 years or more. In a high-traffic commercial setting, its lifespan is typically 7-12 years, though this can be extended with periodic topcoat applications.
How much does resin flooring cost per square foot?
For professional installation, expect to pay between $7 and $15 per square foot. High-end decorative systems can exceed $20. DIY kits and materials can bring the cost down to $2 to $7 per square foot, not including tool rental.
Can resin flooring be installed over existing concrete or tile?
It can be installed over concrete, which is the ideal substrate. Installation over tile is possible but not recommended. It requires scuffing the glaze off every tile and filling all grout lines to create a flat, monolithic surface, which is labor-intensive and carries a higher risk of failure.
Is resin flooring safe for homes?
Once fully cured, resin flooring is completely inert, safe, and non-toxic. During installation, however, VOCs are released. It is crucial to use proper ventilation and wear a respirator. Opting for a 100% solids, low-VOC product significantly improves indoor air quality during the curing process.
Can I DIY resin flooring or should I hire a pro?
DIY is feasible for small, simple projects like a garage if the concrete is in good shape and you are prepared for the demanding labor of surface prep. For large areas, decorative finishes, or floors with moisture issues, hiring a professional is strongly recommended to ensure a successful, long-lasting result.
Conclusion: Choosing Your Resin Floor
Resin flooring offers an unparalleled combination of durability, performance, and aesthetic flexibility. Whether you need a bomb-proof surface for an industrial plant or a stunning decorative floor for a retail space, there is a system designed to meet your needs.
The key to success lies in choosing the right system for the environment and, most importantly, committing to meticulous surface preparation. An epoxy floor is perfect for a garage demanding strength and chemical resistance, while a polyurethane topcoat provides superior scratch resistance for a busy commercial lobby. For projects on a tight deadline, fast-curing polyaspartics are the answer.
By understanding the types, costs, and critical installation steps, you can make an informed decision that results in a seamless, high-performance floor that will protect and enhance your space for decades to come.