
An epoxy resin floor offers a unique combination of toughness, durability, and style, making it a popular choice for spaces ranging from high-traffic industrial warehouses to modern residential garages and basements. This seamless, high-performance surface is created by mixing a resin with a chemical hardener, resulting in a coating that bonds tightly to concrete. The result is a floor that resists chemicals, abrasion, and heavy impacts while providing a clean, customizable finish. Whether you’re a homeowner looking to upgrade your garage or a contractor specifying a floor for a commercial client, understanding the nuances of epoxy systems is key to a successful, long-lasting installation.
This guide provides a complete overview of everything you need to know about epoxy resin floor systems in 2025. We will cover the different types available, break down installation costs by region, and walk through the step-by-step installation process. You will also find detailed information on proper surface preparation, long-term maintenance, and the latest design trends. From deciding between a DIY kit and a professional installer to comparing epoxy with other flooring like polyaspartic and polished concrete, this resource will equip you with the knowledge to make informed decisions for your project.
What is an epoxy resin floor?
An epoxy resin floor is a flooring surface comprised of multiple layers of epoxy applied to a prepared concrete substrate. At its core, the system relies on a two-part chemical reaction between a resin and a hardener. When these components are mixed, they trigger a process called curing, where the liquid mixture transforms into a rigid, durable plastic film. This film bonds tenaciously to the concrete, creating a seamless, non-porous surface that protects the underlying slab from moisture, stains, chemicals, and wear. Unlike paint, an epoxy floor builds significant thickness, ranging from a thin coating to a quarter-inch or more, providing substantial impact resistance.
A typical residential garage installation illustrates its lifecycle well. A homeowner might choose a 100% solids epoxy system for its superior durability and low VOC content. After the concrete is ground and cleaned, a primer is applied to ensure a strong bond. Next, the epoxy base coat is laid down, followed by the broadcast of decorative vinyl flakes. Finally, a clear, chemical-resistant topcoat is applied to seal the system and provide a protective, easy-to-clean finish. With proper installation and basic care, this floor can last 15-20 years before needing a refresh, far outperforming simple concrete paints or sealers.
Epoxy chemistry in plain English
Think of epoxy as a high-strength glue for your floor. The resin part is made of polymer chains, and the hardener contains a co-reactant. When mixed, they link together in a process called “cross-linking,” forming a dense, stable, and incredibly strong matrix. This chemical bond is what gives epoxy its renowned strength and resistance to breakdown from oil, gasoline, and other common chemicals. The most robust formulations are “100% solids,” meaning the entire mixture becomes part of the final solid floor, with nothing lost to evaporation. Water-based epoxies use water as a carrier, which evaporates during curing, resulting in a thinner, less durable film but with the benefit of lower odor and easier cleanup.
Types of epoxy resin floors and finishes
Epoxy flooring is not a one-size-fits-all solution. The type of system you choose depends on your aesthetic goals, performance requirements, and budget. Each finish offers a distinct look and set of properties, making it suitable for different environments, from residential basements to heavy-duty industrial facilities.
Metallic epoxy
Metallic epoxy floors are prized for their stunning, three-dimensional appearance. They are created by mixing metallic pigment powders into a clear epoxy resin, which is then poured and manipulated with tools like rollers or squeegees to create swirling, pearlescent designs that mimic natural stone, molten metal, or flowing water. Because each installation is hand-applied, no two metallic floors are exactly alike. This system is a popular choice for high-end residential spaces, retail showrooms, restaurants, and office lobbies where a dramatic visual impact is desired. While beautiful, metallic floors require a skilled installer to achieve a professional look and are typically thicker and more expensive than standard flake or solid-color systems.
Flake (chip) systems
Flake or chip epoxy floors are one of the most common and versatile options. This system involves broadcasting decorative vinyl flakes or chips onto a wet epoxy base coat. The flakes are then sealed in with one or more clear topcoats. The result is a textured, multi-hued finish that is excellent at hiding minor subfloor imperfections. Flake systems offer a wide range of color blends and sizes, from micro-flakes for a subtle granite-like appearance to large quarter-inch flakes for a bold, terrazzo-style look. They also provide a degree of slip resistance, making them ideal for garages, commercial kitchens, locker rooms, and schools.
High-build industrial epoxies
For environments that demand maximum durability, high-build industrial epoxies are the standard. These systems are typically 100% solids formulations applied in multiple thick coats to create a floor capable of withstanding heavy forklift traffic, chemical spills, and severe abrasion. Often, aggregates like quartz sand are broadcast into the epoxy and sealed to create a mortar-like, highly durable, and slip-resistant surface. These utilitarian floors prioritize function over form and are the go-to choice for manufacturing plants, warehouses, food processing facilities, and chemical storage areas. They are designed for performance and longevity under the harshest conditions.
Epoxy resin floor costs (2025) — a regional breakdown
The cost of an epoxy resin floor can vary significantly based on several factors, including the type of system, the condition of the existing concrete, the total square footage, and your geographic location. As of 2025, homeowners and facility managers can expect a wide price range. For a basic, professionally installed solid-color epoxy coating in the US, prices generally range from $4 to $9 per square foot. Decorative systems, such as flake or quartz floors, typically cost between $6 and $12 per square foot. High-end metallic epoxy systems can run from $8 to $15 per square foot or more due to the higher material cost and labor-intensive application process.
In the UK, the pricing structure is similar. A standard epoxy floor installation costs approximately £35 to £65 per square meter. Decorative flake systems are often in the £55 to £90 per square meter range, while premium metallic designs can exceed £100 per square meter.
Several key factors drive these costs. Extensive concrete repair, such as filling large cracks or leveling an uneven surface, will add to the final price. The level of surface preparation required—whether diamond grinding or shot blasting—is also a major cost component. Thicker, high-build systems use more material and therefore cost more than thin-film coatings. Finally, regional labor rates play a significant role. For example, an installation in a high-cost area like New York City or London will be more expensive than the same project in the Midwest or a rural UK county. Always get multiple quotes from qualified installers to understand the full scope and cost for your specific project.
Should you DIY or hire a pro?
Deciding whether to install an epoxy floor yourself or hire a professional is a critical decision that impacts both the cost and the quality of the final outcome. While DIY kits are widely available and can seem like a cost-effective option, a successful epoxy installation requires careful preparation and execution that can be challenging for a novice.
When DIY works
A DIY epoxy flooring project can be a viable option under specific circumstances. The ideal scenario is a small, straightforward area like a one or two-car residential garage where the concrete is in excellent condition—meaning it’s relatively new, level, and free of major cracks, spalling, or moisture issues. Most DIY kits are water-based or lower-solids epoxy formulations, which are more forgiving to apply but result in a thinner, less durable coating than professional-grade 100% solids epoxy. If you are comfortable with thorough surface preparation (including acid etching or mechanical grinding with rented equipment), can follow mixing instructions precisely, and are prepared for a physically demanding project with a strict timeline, a DIY kit can provide a satisfactory aesthetic upgrade for a light-duty residential space.
When you must hire a pro
For most commercial applications and even many residential projects, hiring a professional contractor is the recommended choice. You should always hire a pro if the concrete slab has any issues, such as high moisture vapor emissions, extensive cracking, or an old, failing coating that needs to be removed. Professionals have access to industrial-grade equipment like large diamond grinders and shot blasters, which provide a much better surface profile for the epoxy to bond to than DIY methods. They also use 100% solids, commercial-grade epoxy materials that are more durable and chemical-resistant. Furthermore, experienced installers can create complex decorative finishes like metallic or custom flake patterns that are nearly impossible to achieve without training. Finally, a professional installation typically comes with a warranty, giving you peace of mind that the investment is protected against failures like peeling or delamination.
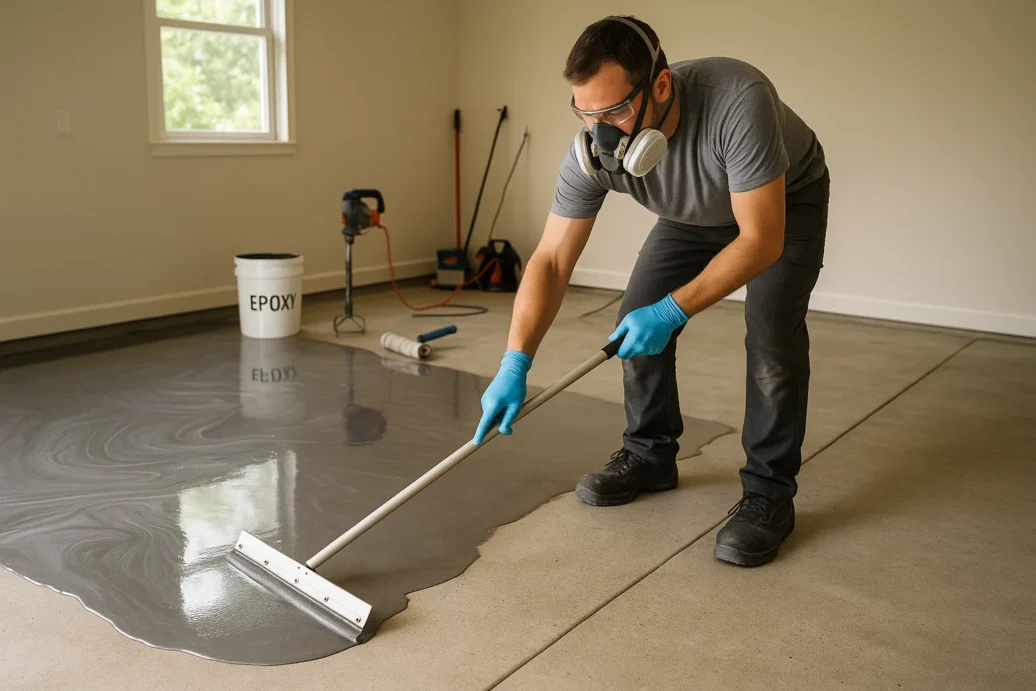
Step-by-step installation
A professional epoxy resin floor installation is a multi-stage process where each step is crucial for a durable and long-lasting finish. Skipping or rushing any part, especially surface preparation, is a primary cause of floor failure.
Surface prep
This is the most critical stage. The goal is to create a clean, porous, and profiled surface for the epoxy to mechanically bond with. Professionals use diamond grinders or shot blasters to remove any existing sealers, contaminants, and the weak top layer of concrete, creating a “Concrete Surface Profile” (CSP) of 2-3. The entire floor is then thoroughly vacuumed to remove all dust and debris.
Priming
After prep, a primer coat is applied. The primer is a lower-viscosity epoxy that soaks into the porous concrete, sealing it and creating an anchor for the subsequent layers. Priming prevents outgassing (bubbles in the base coat) and ensures a tenacious bond between the concrete slab and the epoxy system. For concrete with known moisture issues, a specialized moisture-mitigating primer is used.
Base coat & broadcast
Once the primer is tacky or cured (depending on the product), the epoxy base coat is applied. This is the color coat and the main build layer of the floor. The mixed epoxy is poured onto the floor and spread evenly with a squeegee and then back-rolled to achieve a uniform thickness. If it is a flake system, the decorative vinyl chips are broadcast generously over the wet base coat until the surface is fully covered.
Topcoat & curing
After the base coat (and flakes) have cured, the floor is scraped or sanded to remove any excess, loose flakes and create a smooth texture. The area is vacuumed again. Finally, one or two clear, protective topcoats are applied. The topcoat is typically a chemical-resistant and UV-stable material like polyurethane or polyaspartic, which protects the epoxy layer from scratches, abrasion, and yellowing from sunlight. The floor must then cure for a specified period—typically 24 hours for light foot traffic and up to 7 days for heavy traffic and vehicle use.
Preparing concrete correctly
The long-term success of an epoxy resin floor depends almost entirely on the quality of the concrete preparation. A poorly prepared surface is the leading cause of coating failures like peeling, blistering, and delamination. Proper preparation ensures that the epoxy forms a permanent mechanical bond with a solid, stable substrate. A key aspect of this is managing moisture. Concrete is porous and can transmit water vapor from the ground beneath it. If this moisture vapor is trapped under a non-breathable epoxy coating, it can build hydrostatic pressure and push the coating off the floor. Before any installation, a moisture test, such as a Calcium Chloride (ASTM F1869) or In-Situ Relative Humidity (ASTM F2170) test, is essential. If moisture emissions are too high, a specialized moisture-mitigating epoxy primer must be used to block the vapor before the main system is applied.
Shot blasting vs grinding vs acid etch
There are three primary methods for profiling concrete, each with its own place.
- Acid Etching: This is the method included in most DIY kits. It involves washing the concrete with a mild acid solution to roughen the surface. While it’s better than no prep at all, it is the least effective method. It often fails to remove old sealers or contaminants and can result in an inconsistent profile, leading to bond failures.
- Diamond Grinding: This is the most common professional method. A machine with rotating diamond-impregnated discs grinds away the top layer of concrete, removing contaminants and creating a uniform, porous surface ideal for coating adhesion. Grinders are versatile and can be used to level uneven spots and smooth out rough areas.
- Shot Blasting: This is the most aggressive and efficient method, typically used for large industrial projects. A machine propels tiny steel beads (shot) at high velocity onto the concrete, pulverizing the top layer and immediately vacuuming up the debris. Shot blasting creates a very consistent and deep profile, perfect for thick, high-build epoxy systems.
Maintenance & long-term care
One of the primary benefits of an epoxy resin floor is its low-maintenance nature. The seamless, non-porous surface is easy to clean and highly resistant to stains, chemicals, and dirt penetration. However, a proper care routine is essential to preserve its appearance and extend its lifespan. For daily or weekly cleaning, simply use a soft-bristle broom or a dust mop to remove loose grit and debris that could otherwise scratch the surface. For a deeper clean, mop the floor with a pH-neutral cleaner and water. Avoid using harsh, acidic cleaners (like citrus-based products) or soap-based detergents, as they can dull the finish or leave a slippery residue. Spills should be wiped up promptly to prevent any potential for staining, particularly with highly pigmented liquids or harsh chemicals.
Cleaning schedule & scratch repair tips
A simple maintenance calendar can keep your floor looking its best for years.
- Weekly: Dust mop or sweep the floor to remove abrasive dirt.
- Monthly (or as needed): Mop the floor with a pH-neutral cleaner. For commercial settings with heavy traffic, this may be a daily task.
- Annually: Inspect the floor for any deep scratches, gouges, or areas of wear, particularly in high-traffic lanes.
- Every 5-7 Years: Depending on the level of wear, a professional recoat of the topcoat may be necessary to restore the gloss and protective layer. This “sacrificial” topcoat takes the brunt of the daily wear and tear.
For minor scratches, sometimes a simple polish or a specialized epoxy repair kit can be used for a touch-up. Deeper gouges may require filling with an epoxy patching compound before being sanded and sealed. To prevent scratches, place walk-off mats at all entryways to trap abrasive dirt, and use felt pads under heavy furniture or equipment.
Safety, VOCs & sustainability considerations
When planning an epoxy floor installation, it’s important to consider the health, safety, and environmental impact of the materials being used. Historically, epoxy systems were solvent-based and contained high levels of Volatile Organic Compounds (VOCs). VOCs are chemicals that evaporate into the air during the curing process and can cause respiratory irritation and other health issues. Installers must wear appropriate Personal Protective Equipment (PPE), including respirators with organic vapor cartridges, safety glasses, and gloves, especially when working with solvent-based or 100% solids epoxies in enclosed spaces. Proper ventilation is also critical to dissipate fumes and ensure a safe working environment. Unused or expired epoxy components are considered chemical waste and must be disposed of according to local regulations, not poured down the drain or into the regular trash.
Low-VOC products and LEED points
In recent years, there has been a significant shift towards more sustainable and healthier flooring solutions. In response, manufacturers have developed low-VOC and zero-VOC epoxy formulations. Water-based epoxies inherently have very low VOC content and are often preferred for occupied spaces like hospitals, schools, and offices where air quality is a primary concern. Additionally, many 100% solids epoxy systems now contain zero VOCs, as the entire mixture reacts to form a solid without any solvent evaporation.
These eco-friendly products not only improve indoor air quality but can also contribute to green building certifications like LEED (Leadership in Energy and Environmental Design). Using materials with low VOC emissions can earn points toward LEED certification, making them an attractive option for sustainable construction and renovation projects. As consumer and regulatory demand for greener products grows, bio-based epoxies, which replace some petroleum-derived components with renewable materials, are also becoming more prevalent in the market.
Design ideas & trends for 2025
Epoxy flooring has moved far beyond the simple gray utilitarian coatings of the past. Today, it serves as a canvas for a wide range of design possibilities, allowing for unique and highly customized aesthetics. The most prominent trend for 2025 continues to be metallic epoxy systems. Their ability to create deep, flowing, three-dimensional patterns makes them a centerpiece in luxury residential homes, high-end retail stores, and modern office spaces. Installers are pushing creative boundaries by combining multiple metallic colors and using advanced techniques to achieve effects that mimic marble, natural stone, or even cosmic nebulas.
Another significant trend is the move toward more natural and subtle design palettes. Instead of bold, vibrant colors, many clients are opting for earthy tones, muted grays, and warm beiges in both flake and solid-color systems. These designs create a clean, minimalist, and sophisticated look that complements contemporary architectural styles. In flake systems, smaller micro-flakes are gaining popularity over larger chips to create a more refined, granite-like texture. There is also growing interest in 3D epoxy floors, where a high-resolution printed image is laid on the floor and then encapsulated in deep layers of clear epoxy, creating a stunning and immersive visual effect. This is particularly popular in children’s play areas, themed entertainment venues, and bathrooms. The design choice directly impacts complexity and cost; intricate metallic or 3D floors require highly skilled labor and more material, placing them at the premium end of the market.
Compare: epoxy vs polyaspartic vs polished concrete
When choosing a seamless floor, epoxy is just one of several excellent options. Understanding how it stacks up against alternatives like polyaspartic coatings and polished concrete is key to selecting the right solution for your application.
Feature | Epoxy | Polyaspartic | Polished Concrete |
|---|---|---|---|
Cure Time | Slow (12-24 hours per coat) | Very Fast (1-2 hours per coat) | N/A (Mechanical Process) |
UV Resistance | Low (can yellow with sun exposure) | High (non-yellowing) | Excellent |
Cost | Moderate | High | Moderate to High |
Durability | Excellent (hard, abrasion-resistant) | Excellent (flexible, scratch-resistant) | Very Good (can chip/stain if unsealed) |
Application | Long working time, easier for DIY | Short working time, pro install needed | Pro install needed, very dusty |
VOCs | Varies (low to high) | Typically low VOC | Zero VOC |
Best For | Basements, industrial floors, garages | Garages, outdoor spaces, fast-turnaround projects | Retail, showrooms, modern homes |
Epoxy: Its longer working time makes it more forgiving for complex decorative applications. It has excellent compressive strength and is highly resistant to many chemicals, making it an industrial workhorse. Its primary weakness is a lack of UV stability, which causes it to amber or yellow over time with sun exposure.
Polyaspartic: A type of polyurea, its main advantage is its incredibly fast cure time, allowing for a full system to be installed in a single day. It is also highly flexible, scratch-resistant, and UV-stable, making it a superior choice for topcoats and for floors exposed to sunlight. However, its fast cure requires a highly skilled professional installer.
Polished Concrete: This is not a coating but a mechanical process of grinding and honing the concrete itself to a high-gloss finish. It creates a beautiful, rustic, and extremely durable surface. It is breathable and will never peel, but it is not impervious to stains unless properly sealed and maintained with a densifier.
Pros & Cons of epoxy flooring
Epoxy flooring offers a compelling mix of benefits, but it’s important to be aware of its limitations before committing to an installation.
Pros:
- Durability: Creates a hard, thick surface that is highly resistant to impact, abrasion, and heavy loads.
- Chemical Resistance: Protects concrete from stains and damage from oil, gasoline, bleach, and other common chemicals.
- Seamless & Hygienic: The non-porous surface has no grout lines or joints to trap dirt, dust, or bacteria, making it exceptionally easy to clean.
- Aesthetics: Available in a vast range of colors, finishes (metallic, flake), and custom designs to suit any style.
- Safety: Additives like slip-resistant aggregates can be incorporated to enhance traction in wet or oily environments.
- Cost-Effective: Offers a long service life for a moderate initial investment compared to many other commercial flooring options.
Cons:
- Slippery When Wet: The high-gloss finish can become very slippery when wet, unless a slip-resistant additive is used.
- Complex Preparation: Requires intensive, professional-grade surface preparation for a successful, long-term bond.
- UV Sensitivity: Standard aromatic epoxies will yellow or amber when exposed to direct sunlight over time. UV-stable topcoats are required for areas with windows.
- Cold & Hard Underfoot: As a rigid surface, it can feel hard and cold underfoot, and it does not offer sound-dampening qualities.
- Temporary: While durable, it is still a coating. It can chip or peel if improperly installed or if a heavy object is dropped on it, and it will eventually wear out and require recoating.
Who should choose epoxy? Epoxy is an excellent choice for anyone needing a durable, protective, and easy-to-clean floor for a garage, basement, workshop, commercial kitchen, warehouse, or healthcare facility. It’s ideal for situations where concrete needs protection from wear and chemical spills, and where a seamless, hygienic surface is a priority.
Frequently Asked Questions
What is an epoxy resin floor and how does it work?
An epoxy resin floor is a protective and decorative coating for concrete. It is created by mixing a liquid resin with a chemical hardener. This mixture is applied to a prepared concrete surface, where it cures into a hard, rigid plastic film. This process creates a strong, seamless bond with the concrete, resulting in a durable, non-porous surface that resists chemicals, abrasion, and impact.
How long does an epoxy floor last?
The lifespan of an epoxy floor depends on the quality of the installation, the thickness of the coating, and the level of traffic it endures. A professionally installed, high-quality epoxy floor in a residential garage can last 15 to 20 years or more. In a heavy-traffic commercial or industrial environment, it may last 5 to 10 years before needing a recoat of the top layer. Thin, DIY-grade coatings may only last a few years.
Can you put epoxy over existing concrete or old coatings?
Yes, you can apply epoxy over existing concrete, provided it is properly prepared. Preparation involves mechanically grinding the surface to remove contaminants and create a porous profile for the epoxy to bond to. You can also apply epoxy over some old coatings, but the existing coating must be well-adhered. Any loose, peeling, or failing coating must be completely removed by grinding before a new system is applied.
How much does an epoxy floor cost per sq. ft. (USA / UK) in 2025?
In 2025, a professionally installed epoxy floor in the USA typically costs between $4 and $12 per square foot, depending on the system. Basic systems are at the lower end, while decorative flake and metallic systems are at the higher end. In the UK, the cost ranges from approximately £35 to £90 per square meter. Factors like concrete condition and regional labor rates will affect the final price.
Is epoxy flooring suitable for garages and basements?
Absolutely. Epoxy flooring is an excellent choice for both garages and basements. In garages, it protects the concrete from hot tire pickup, oil spills, and road salts while being easy to clean. In basements, it creates a seamless, waterproof barrier that prevents moisture from seeping through the concrete, helping to reduce dampness and musty odors. Its durable and attractive finish makes it a practical upgrade for both spaces.
What are the differences between metallic epoxy, flake epoxy, and 100% solids epoxy?
Metallic epoxy contains metallic pigments to create a flowing, three-dimensional, high-end decorative look. Flake epoxy involves broadcasting vinyl chips onto a base coat to create a textured, multi-colored, granite-like finish that offers slip resistance. 100% solids epoxy refers to the formulation itself; it contains no water or solvents that evaporate. This means the entire mixture cures into a thick, highly durable film, making it the strongest and most chemical-resistant type of epoxy.
How do you prepare a concrete floor for epoxy?
Proper preparation is crucial. The best practice is to mechanically profile the concrete using a diamond grinder or shot blaster. This process removes the weak top layer of concrete and any contaminants, creating a porous surface profile (CSP 2-3) that the epoxy can securely bond to. After grinding, the entire area must be thoroughly vacuumed to remove all dust. Any cracks or spalls must also be repaired before coating.
Conclusion
Choosing the right floor is a significant decision, and an epoxy resin floor offers a powerful blend of durability, performance, and aesthetic flexibility that few other systems can match. From the rugged demands of an industrial facility to the stylish finish of a modern home, there is an epoxy solution to fit the need. The key to success lies in a clear understanding of the process: selecting the right system for the environment, committing to meticulous surface preparation, and following a proper maintenance routine. Whether you opt for a decorative metallic finish or a practical flake system, a well-installed epoxy floor is a long-term investment that protects your concrete, simplifies cleaning, and enhances the value and usability of your space.
To make the best decision for your project, start by evaluating your concrete’s condition and your performance needs. Is it a high-traffic commercial area or a residential garage? Are you seeking a show-stopping design or pure utilitarian function? Answering these questions will guide you toward the right system and help you decide between a DIY approach and hiring a seasoned professional. With the right knowledge, you can ensure your epoxy resin floor delivers on its promise of strength and style for years to come.